
Hello everyone, Harley here again (@thatcraftydafty) with my monthly update on the Patchwork and Quilting variant of the My Guilty Pleasure Subscription Service.
The Patchwork and Quilting option for the My Guilty Pleasure Subscription Service is designed to have you make a block each month, and by the end of the twelfth month you will have enough blocks to make a sampler quilt.
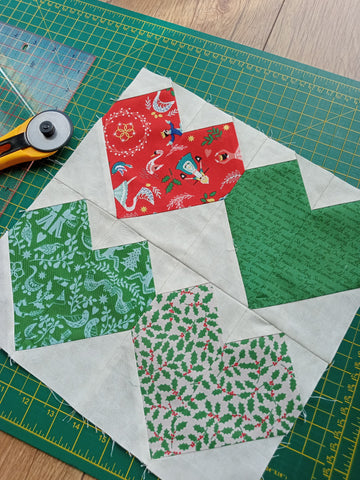
The third Block of the Month is the Stitch & Flip Hearts.
As always, inside this month’s box I received the following:
x 4 Fat Eighths of a new Lewis & Irene collection
x 1 Fat Quarter of a background
Fully printed instructions for the Block of the Month, complete with helpful illustrations
x 1 spool of thread, in a coordinating colour
x 1 surprise! (A chocolate penny this month, in keeping with the Christmas theme!)
I must say, seeing a Christmas collection of fabric has put me in the festive mood already – I love Christmas! This new collection from Lewis & Irene is called “The Twelve Days of Christmas” and the prints feature quaint festive notions, patterns, and characters from the song, which took me right back to singing the song at our Christmas assemblies back in primary school.
Now, the stitch and flip method can prove a little tricky for even the most experienced quilter. There are many means to do the S&F method but the way I prefer to do it is a little… laborious. I draw lines across the diagonals on the back of the necessary pieces and sew either on the line, or just a hair to the right of the line (or towards the corner that you’re flipping the triangle to). This is the method that works for me, but I know that there are a variety of means to get the same result: some people use diagonal seam tape stuck to their machine, others prefer to just eye it from corner to corner - the choice is yours! Experiment and see.
This was quite a fun block to work on due to the number of small units that are needed to make up the block, which helps keep my knowledge of pressing seams fresh and sharp. I’m not usually one to press my seams open, unless there’s going to be a lot of bulk cause by loads of seams meeting at a particular point. So, my tip for you is as follows:
If you’re pressing your seams to one side, be sure to press the corner triangles in opposite directions from each. This is quite easy to figure out as there are smaller units in each of the heart blocks that are repeated throughout the whole quilt block. So, you simply just need to make sure that you’re pressing similar units in the same direction, and they’ll nest neatly when it comes to putting them all together. For example, the two (2) 2” squares at the top of the rectangle units are pressed in opposite directions, and I repeat this for each of the square on all rectangular units. See picture below for example.

If you’d like to try pressing your seams open for a change, then I’d recommend pinning intersections after pressing to make sure that points match, and everything lies as flat as possible.
Also, it’s fun to see what a block will look like with the S&F method if you use different sized corner squares. In the example below I used 2” squares on the first row of hearts (which the pattern called for), and then 2.5” squares on the second row of hearts. This was actually a mistake on my part – always read your patterns thoroughly, kids! However, I actually like seeing what a difference it makes to the overall look of a block. Something to bear in mind if you’re ever making your own patterns using the S&F technique.

As always, I hope you’ve found this blog entry useful. I’ll be providing updates every month via the Little Miss Sew ‘n’ Sew blogs on their website, but you can check out little sewing updates via my Instagram account: @thatcraftydafty. Hope to see you there.
Thanks for sticking around!
H.